Stock Level Analysis
From the Main Home Screen page you can access the Stock Level Section. This will show you an Inventory analysis page. The page guides you through Departments and various parts of their inventory information. Click on the Stock Level button on the Quick Launch section of the Main Navigation Toolbar.
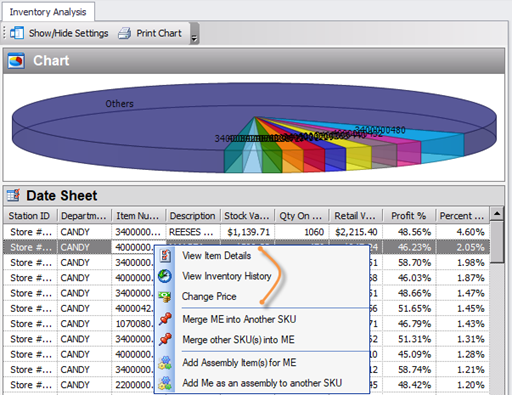
Once it opens you can see a colorful chart of departments as well as the departments listed below it. Double click a department to view more information about it.
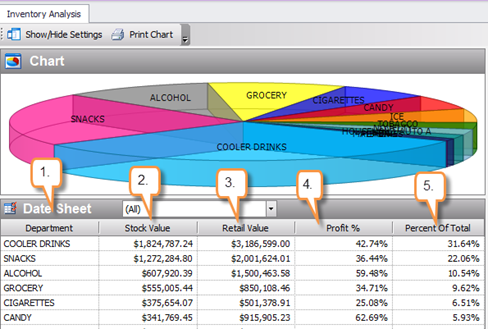
1. Department: Listed departments for items
2. Stock Value: Value of known stock on hand
3. Retail Value: Retail Value of known stock on hand
4. Profit %: Profit percentage of each department
5. Percent of Total: The percent of total each department makes up for inventory.
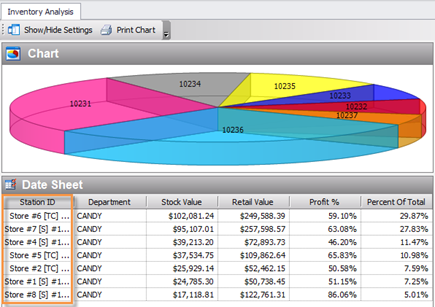
When the next page opens choose which station you would like to view.
NOTE: You will see this show up if you have multiple sites to choose from. If you are a one site database you will go straight to the department information*
Now you can view the items in the department and also station you selected.
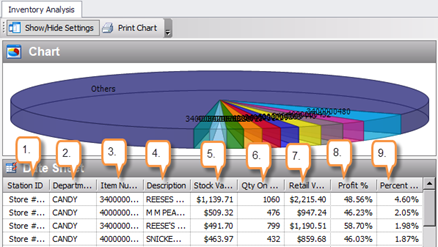
1. Station ID Number: Station name and ID number
2. Department: Department the item is in
3. Item Number: UPC of the item
4. Description: Description of the item
5. Stock Value: Known value of stock on hand
6. Qty On Hand: Known Qty on hand
7. Retail Value: Retail Value of known stock on hand
8. Profit Percentage: Percentage each item makes up for the department
9. Percent of Total: Percent of the total for the department the item makes up
If you would like even more information on an item, you can right click on it and choose one of the 3 options that pops up. Your options are View Item Details, View Inventory History, and Change Price.
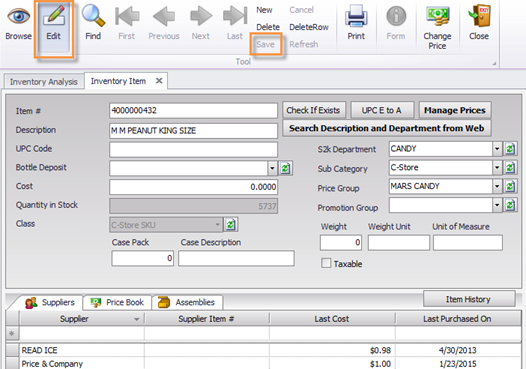
Let’s click on View Item Details First. Once this page opens you are now in a page called Inventory Item.
This gives you information about the item that can be edited as needed.
Select Edit to make changes to the open lines.
If you make changes, make sure to click into another box and then select save.
Next go back to the Inventory Analysis tab and right click your item again. Now select View Inventory History. The page that opens is the Inventory History of the item.
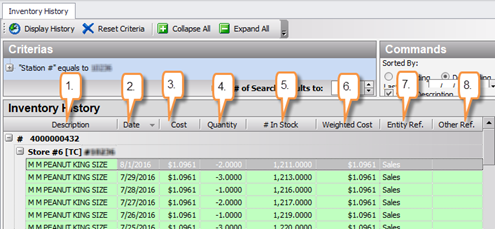
1. Description: Item UPC number and Name
2. Date: Sorted with most recent action at the top
3. Cost: Currently known cost information
4. Quantity: How many were sold or brought in depending on the action being taken
5. # In Stock: How many of an item is currently known in stock
6. Weighted Cost: Average cost
7. Entity Ref.: Action done. (ex: Sales, TI, Waste, Vendor Name if an invoice)
8. Other Ref.: Invoice number if available
Next go back to the Inventory Analysis tab and right click your item again.
Now select Change Price. The pricebook page for the item will open and allow you to make a change or view the retail price.
Save if any changes are made.
(See Pricebook In the Manual for a how to on making price changes)
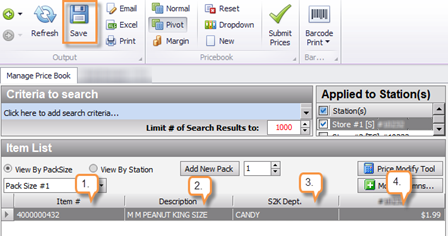
1. Item Number: UPC or PLU number the item is known by
2. Description: Name of the item
3. S2K Dept: Department the item is set up in
4. Station Number: This shows the station number and the retail price for that station