Daily Reconcilation Navigation Tool Bar Legend
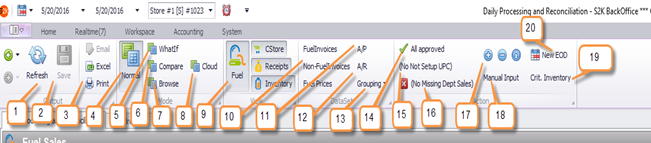
1. Refresh- Refreshes the Daily Recon window. Save first if changes are made.
2. Save- Save any changes to the daily reconciliation. If you do not save before leaving this window you will potentially lose the changes.
3. Excel and Print- these buttons allow you to export the daily recon to Excel or Print it in a report
4. MODE – Normal – Default view, if you select a different mode, by re-clicking on NORMAL it will bring you back to the original default view. Always reconcile in the normal mode
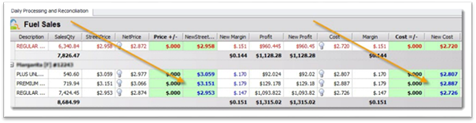
5. MODE – What if – This is our “what if” scenario for fuel. It changes only the view of the fuel sales section. Enter “what if” scenarios for fuel retail and cost to see what the results would be in different instances. Just click on the GREEN sections to see the results. To go back just click NORMAL.
6. MODE – Compare – This is for C-store Sales. It compares the sales date being reviewed to the same day the previous week. It also shows you the % difference. Click NORMAL to return back.
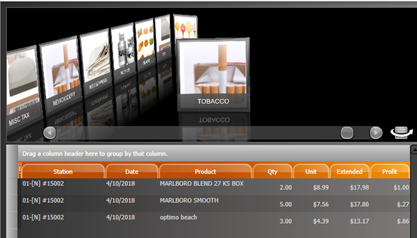
7. MODE – Browse – alternate view of the C-Store sales information. Click normal to return back to regular screen.
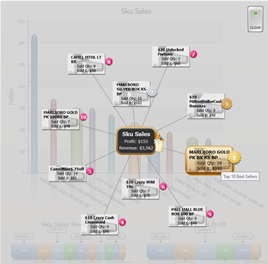
8. MODE – Cloud – cloud view allows you to compare the revenue between stations, review top selling departments for the selected date, and review top 10 selling items for the selected date. Click normal to return back to regular screen.
9. View/Hide tabs- Similar to an on/off switch these view options will allow you to show or hide one or more of the 4 areas of the sales data: FUEL SALES, CSTORE SALES, RECEIPTS or INVENTORY.NOTE: Click to hide the section, click again to make it re-appear.
10. Fuel/ Non-Fuel Invoices – These icons will provide you with a filtered view of invoices for only the date(s) selected.
11. AP (Accounts Payable) – Apply details for cash payouts preformed at the POS for vendors/suppliers.
12. AR (Accounts Receivable) – Apply details for pay-ins, house accounts, local accounts, etc. for account /customer charges.
13. Grouping – Changes the way your data is grouped.
14. Approval – Click to approve your day and/or attach files for the day
15. Not-Setup UPC – Shows any items that sold but were not-setup in S2K
16. Missing DEPT – Shows any items that were setup in departments that were not imported into the C-Store Sales detail from the POS. The item(s) may belong to a department in S2k that is not at the POS.
17. Expand Button – expand or reduce the collapsed sections on the page
18. Manual Input – manually add a department to the C-Store section. Or manually add any items not displayed in the sales windows.
19. Critical Inventory – quick access to enter your critical inventory for the day (setup required)
20. NEW EOD – Creating a blank EOD for the site to manually enter in the sales information.